A Beginner’s Guide To Scrambling


Ever gazed upon a route to a summit and felt the urge to add a dose of adventure to your hillwalking? Or been keen to try climbing but feel put off by all the equipment, technical skills and experience you need to tackle those big exposed-looking routes? If you’re looking to take your hillwalking to the next level without jumping right in at the deep end of climbing, then scrambling could be for you.

Our handy guide will take you through everything you need to know from what it is, where to go and the kit you’ll need to make the exciting transition from walker to scrambler.


What is Scrambling?

Scrambling is one of the most exhilarating ways to explore the hills and mountains, but it can be a tricky activity to define. The best way to understand scrambling is to think about what it isn’t:

  • Not Just Walking: Scrambling is more challenging than simply hiking or hillwalking. While you’ll still be following paths or routes up a mountain, you’ll encounter sections where walking alone won’t get you to the top.
  • Not Full-On Climbing: Unlike technical rock climbing, scrambling doesn’t usually require ropes, harnesses, or lots of specialist equipment. You won’t be tackling sheer vertical faces or relying solely on climbing gear for safety.

The Middle Ground

Scrambling sits in the sweet spot between hiking and climbing. Here’s what sets it apart:

  • Hands-On Movement: On a scramble, you’ll often need to use your hands as well as your feet to make progress. This might mean clambering over rocks, pulling yourself up short rocky steps, or balancing along narrow ridges.
  • Exposure: Some scrambling routes are more exposed than typical walking trails, with steeper drops and more dramatic scenery. However, they’re generally less daunting than true climbing routes.
  • Minimal Equipment: Most scrambles can be tackled with sturdy footwear and a good sense of balance. Occasionally, a helmet or a short length of rope might be used for extra safety on trickier sections, but for most beginners, this isn’t necessary.

Why Try Scrambling?

If you’re looking to add a bit more excitement and challenge to your hillwalking adventures, scrambling is the perfect next step. Here’s why it’s so popular:

  • Adventure: Scrambling brings a real sense of adventure, combining the best elements of walking, mountaineering, and climbing.
  • Physical Challenge: It’s a great way to push your fitness and develop new skills, especially your confidence on rocky terrain.
  • Spectacular Views: Many classic scrambles take you to some of the most breathtaking summits and ridges, offering incredible panoramas as a reward for your effort.
  • Adrenaline Rush: The hands-on nature and exposure of scrambling can give you a real buzz, making even familiar hills feel new and exciting.


Scrambling Grades

To make the transition from walker to scrambler whilst avoiding inadvertently straying into more advanced rock-climbing territory, understanding the grading system is crucial. Scrambles in the UK are graded from 1 to 3 and assume weather conditions are good and dry whilst being undertaken. The natural progression for experienced walkers looking to start scrambling is to start at grade 1. 

Grade 1

A grade 1 scramble is essentially an exposed walking route that takes an interesting route or line up a gully, ridge, or buttress that will require the use of your hands to climb over the steeper sections. If you’ve previously only ever done hillwalking, you’ll need to be prepared for some reasonably exposed sections which will certainly raise your heart rate, but typically you can expect routes that are easy to follow and can be completed without any need for ropes or protection. Whilst the scrambling sections you encounter are relatively straightforward, any difficulties you do run into are generally avoidable with alternative routes. If you’re a competent hillwalker with a decent head for heights, there’s no reason why you can’t immediately make the transition from hillwalking to grade 1 scrambling.

Some of our favourite grade 1 scrambles include:


Grade 2

This is where the line between scrambling and rock climbing starts to become much more blurred, and the use of a rope and harness for protection becomes advisable. That’s because grade 2 scrambles usually include exposed sections where an inexperienced scrambler may want a rope for confidence and protection, and the person in front (the leader) will need to feel confident moving over exposed yet relatively short and easy climbing terrain to overcome a particular obstacle. As such, having knowledge and practice of rock climbing becomes essential, so as you move out of grade 1, we would recommend learning to climb to at least V Diff level or taking a scrambling course before attempting serious scrambling of grade 2 routes or above. Don’t let this put you off though, as once you build up the skills and experience, the routes and rewards are even more spectacular.

As you move into these higher grades, it’s also important not to fall into the misconception that scrambling is a milder and less dangerous version of rock climbing. Because people typically attempt scrambling with less protection than rock climbing, it can actually be the more serious activity. So take your time and build up your experience on different routes and by working safely and steadily through the grades. 

Some of our favourite grade 2 scrambles include:


Grade 3

Grade 3 scrambles often appear in climbing guides as ‘Moderately’ graded climbing routes (the easiest climbing grade) and should only be tackled by experienced scramblers and if you are confident using climbing equipment and lead climbing. On these routes, you can expect to use a rope on several quite highly exposed sections, or the route to contain steep grassy sections which offer no hand holds and where a potential fall would have serious consequences. Escape via alternative routes also becomes more limited as you move up to grade 3 so skills like abseiling may be needed if you need to retreat. However, with the right climbing skills and experience on grade 1 and 2 scrambles, progressing onto something a bit more difficult like grade 3 can be very rewarding and opens up even more great routes to add to your bucket list. 

Some of our favourite grade 3 scrambles include:


What Equipment Do I Need?


Grade 1 Routes

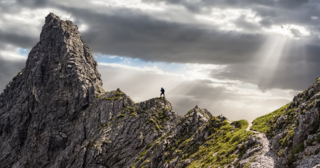
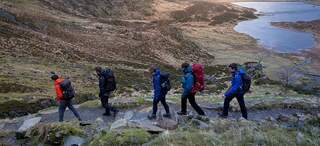
To take on grade 1 routes, you shouldn’t require any additional special equipment beyond your normal walking kit. So, check the weather forecast and wear the same kit you would for a regular hill walk.

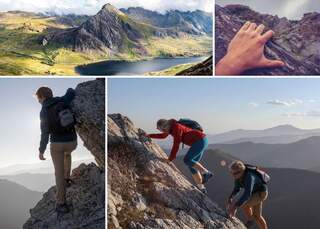
Footwear – Wear standard walking boots for good all-round protection, or approach shoes with sticky soles and good edges if you’re looking for even better grip and easier foot placement. Choosing between shoes and boots really comes down to personal preference and can depend on the conditions and route. Having a pair of both is ideal or you could go for something in between like a mid-boot which is flexible enough to be comfortable, but also offers ankle support.

Clothing – The weather will impact your choice of clothing in the same way it would normal hiking. Wear a breathable base layer and mid-layer to help regulate your temperature and pack a breathable and waterproof jacket in case the weather changes. In terms of your lower half, comfortable, lightweight walking trousers will allow you to move freely over the rocks, but if you are after more protection, look for clothing with extra reinforcement around the knees and elbows. 

Pack – Taking a lightweight daypack big enough to carry just the essentials you need, rather than larger, bulkier packs will make the scrambling sections much easier to negotiate.

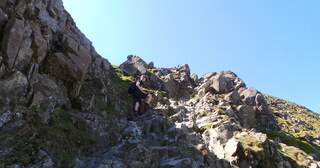
Scrambling Guidebooks – Don’t expect to find signposts or obvious tracks to follow up a scrambling route. There are normally different route options to consider and that’s part of the fun in reaching the summit. Guidebooks do exist for popular scrambling areas though and are highly recommended. A good guide (with pictures) will let you know the grade route in advance and help you navigate and avoid harder sections if you need to.

 Some of our favourite guidebooks include: 


Shop Scrambling Clothing & Footwear

Grade 2 and 3 Routes

In addition to the equipment you need for grade 1, for these higher scrambling grades you’ll also want to take along:

Helmet, harness, 30-60m rope (depending on where you are scrambling), belay plate, nuts and hex set (as a minimum), 2-3 smaller cams, a selection of slings (for pinnacles and flakes), 5 carabiners, 3 BOA HMS carabiners, nut key, headtorch and a prusik.


Shop Climbing


Getting Started

To get started on grade 1 pick a good weather day and research your route fully in advance, but if you feel like you still want the help of more experienced scramblers for your first scrambling adventures you can look into booking a scrambling course. Here’s a list of some oranisations who can provide you with the guidance you need to take you on your first scramble.


Expert Tips

In these videos, our in-store expert Tom talks you through some of his favourite scrambling kit and puts it through its paces on a scramble up Curved Ridge, Glencoe.


Scrambling FAQs


Scrambling is a form of mountain travel that involves using your hands for balance and support on steep, rocky terrain. It bridges the gap between hiking and rock climbing, often following exposed routes that are more technical than standard walks but don’t always require full climbing equipment. 

For most scrambles, you’ll need sturdy boots with good grip, weather-appropriate clothing, a rucksack, map and compass, headtorch, first aid kit, food, and water. On harder routes (Grade 2 or 3), consider a helmet, harness, rope, slings, and carabiners for added safety. 

A rope is not always necessary for Grade 1 scrambles, but it’s recommended for more difficult or exposed routes (Grade 2 and 3), or if group members are less confident. Always ensure someone in your group knows how to use climbing equipment safely before attempting technical scrambles. 

Choose boots or approach shoes with good grip and lateral rigidity for secure footing on rocky and uneven ground. Avoid trainers or smooth-soled shoes, as they can be slippery on grass and wet rock. Waterproof boots are helpful in wet conditions or near streams. 

Plan your route carefully, check the weather, and carry a map and compass. Wear a helmet on loose or exposed terrain, and use a rope and harness on harder scrambles. Always scramble within your ability, and consider taking a course if you’re new to technical terrain. 

Pack lightweight, breathable clothing, waterproofs, gloves, a hat, food and water, a headtorch, first aid kit, map, compass, and personal medications. For technical scrambles, add a helmet, harness, rope, slings, and karabiners. Keep your kit as light as possible while covering all essentials. 


Related Articles


Let us know you agree to cookies

We use marketing, analytical and functional cookies as well as similar technologies to give you the best experience. Third parties, including social media platforms, often place tracking cookies on our site to show you personalised adverts outside of our website.


We store your cookie preferences for two years and you can edit your preferences via ‘manage cookies’ or through the cookie policy at the bottom of every page. For more information, please see our cookie policy.